
I have been meaning for some time to make a 110MHz discone aerial for my RTL-SDR. In theory, this type of aerial should be effective up to 10 times the design frequency for reception. I have come across designs of varying complexity made from different materials such as electrical wire, coat hangers and aluminium bars with some requiring access to a metal workshop. In this post I show how I made a simple discone from galvanised fence wire with little more than simple tools.
Design
The discone dimensions are calculated for the lowest operating frequency. I came across a patent describing its design:

Discone frequency: 110.0MHz (2.727m)
L = cmax: 0.655m
D: 0.458m
cmin: 0.030m
S: 0.009m
I wrote the calculator in python: discone_calc.py.
Assembly
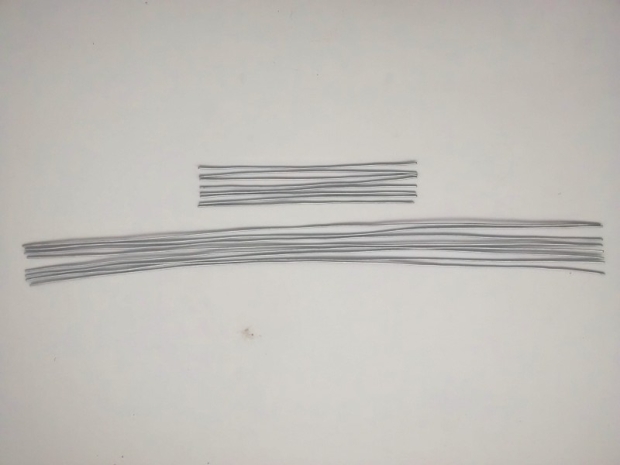
The discone is made up of a disc and a cone. This design has 8 segments so we need to cut and straighten 8 x 25cm segments for the disk and 8 x 68cm segments for the cone.
The disk and cone wire segments are to be soldered to individual hubs made from 2.5cm diameter washers. Each washer has 8 holes drilled in a circle with a 3/32 drill bit where the wire segments will be inserted.

I wrote the template generator in python: discone_hub_template.py. Running the script shows an image to be printed in its correct size (2.5cm x 2.5cm) with an application such as Irfanview.
Soldering tips
If one is unfamiliar soldering with a torch, the basic principle is to apply flux to the joints, use the torch to heat the metal, remove the flame and melt the solder on the hot metal contacts. The flux will help the solder to flow into the gaps by capillary action.
Always apply plenty of flux so that it lasts throughout the soldering otherwise the metal will oxidise and welding will fail or lead to weak joints. If this occurs, the metal contacts need to be cleaned and re-soldered.
Lead-free solder is much stronger than lead based solder even if it has the disadavantage of poorer “flow” when molten. Again, using plenty of good quality zinc chloride based flux (Telux, Fluxite, etc…) makes up for this.
Disc assembly
Prepare the disk wire segments by tightly bending the wire ends.

Insert the bent ends into one of the drilled washers and tape the wire segments to a piece of cardboard.

To keep the wire segments firmly in place during soldering, use another washer and screw to the disk hub.

Solder the wire segments on the top of the washer with a blow torch. When done, add a small terminal tag to connect to the aerial cable.

Cone assembly
Insert the cone wire segments into the other drilled washer. On the inside, I wrapped copper braid around the wire segments to help them stay in place and to accumulate solder while soldering.

Solder the wire segments and copper braid on the inside of the washer with a blow torch. When done, add a small terminal tag to connect to the aerial ground wire.
Make a cone by bending the wire segments slightly below the solder joints. This can be tricky as we do not want to snap the wires. The galvanised wire I used appeared to become slightly brittle with heat so this step requires special care.

Bend the cone wire segments at the correct height and attach a wire rim. To finalise, bend the cone wires around the rim.

Solder the cone wire segments to the rim.

Disc and cone insulator
The disc and cone need to be insulated from each other. This is achieved with a plastic screw washer and a cork spacer.
To make a plastic spacer, find a suitable bottle top.

Drill a hole in the bottle top for the screw and cut to size with wire cutters.

Cut and shape a wine bottle cork to accomodate the disk. The space between the cone and the disk spokes needs to be 9mm. Drill central hole with 7/32 drill bit.

Final assembly
Assemble the cone, spacer, disk together and insert the screw with the insulator. Offset the disk wire segments from the cone wire segments by half the spacing and tighten the screw nut to fix the position.

Solder an aerial coax cable to the discone. The inner conductor needs to be soldered to the disk and the screen to the cone.
Materials
- Wire: Typically sold as galvanised 2.5mm fence wire (approx 10m)
- Washers: Two 25mm diameter with M5 hole.
- Wrapping braid for joints: Desoldering copper braid.
- Screws: M4 x 25mm machine screw with nut
- Spacer: Wine bottle cork and plastic bottle top.
- Terminals: Wire terminals cut from old power diode.
- Downcable for test: Coax 1-2m from old desktop wifi aerial.
- Welding: Gas torch, lead-free solder and ZiCl based flux (Telux, Fluxite, etc…)
- Power tools: Drill, 3/32 (2.4mm) and 7/32 (5.6mm) bits
- Tools: Jigsaw, file, wire pliers, screw driver and tape measure.
Performance
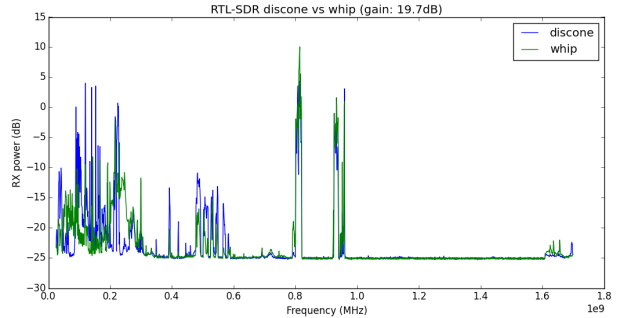
Characterising an aerial is tricky but comparative testing is easy. I compared this discone design with a 10cm 1/4 wave whip supplied with USB TV dongles used for RTL-SDR. In theory, a whip has twice the gain at 3dB of a discone at 0dB.
A RTL-SDR dongle is used with “rtl_power” software to scan from 25MHz to 1.7GHz and measure received power.
rtl_power -f 25M:1700M:1M -i 1m -g 20 -1 wip_25_1700_1M_g20.csv
When the data is plotted, it shows that the discone is much more effective that the whip aerial up to around 0.8GHz where the whip takes over. This is unsurprising as the whip aerial resonates at around 0.7GHz.
In addition to being a wideband aerial, a nice feature of a discone is that the radiation pattern is narrow and horizontal which makes it less sensitive to signals from close by. This gives it some immunity to local noise sources.
I’m really looking forward to using this aerial. Happy DXing as they say…

Hiya. My name’s Steve. I live in South East London and I’m in the process of making your Antenna. I’m using a cheap chinese Box style SDR 100KHz – 1GHz. I’ve build the disc (or star as I keep calling it) and I’m in the process of building the disc.
Hi Steve, thank you for your comments. Lets us know how you get on. It would be good to hear of your experiences, any potential improvements and performance results. Have fun!