
Article index:
Few days ago was the launch day of NVIDIA’s new baby for gamers, the GeForce GTX 560 Ti. ASUS sent me their GTX 560 Ti for testing and reviewing. You can read the complete review here [Tested and Burned] ASUS GeForce GTX 560 Ti DirectCU II TOP Review.
For the review I haven’t had the time to push the GTX 560 Ti GPU to the max. Then I took a little time recently to play with the GPU overclocking.
1 – Preparation
The GeForce GTX 560 Ti is known to be an overclocking beast. The reference clock speed of the GPU is 822MHz and the GPU voltage (or Vcore or VDDC) is 1.025V. In the review I found that the maximum stable GPU clock speed under FurMark for the default VDDC is 940MHz. It’s cool but we can do better. To get higher GPU clock speed, we have to rise the GPU voltage (or VDDC).
Overclocking a GPU is an iterative process and here is the principle:
- Step 1: Increase the GPU clock by 5MHz or 10MHz
- Step 2: Do a stress test. If the test is ok, repeat Step 1 until the stress test fails.
- Step 3: Increase the GPU voltage by 0.01V (until you reach the max) and go to Step 2
For this overclocking session, I used the following tools:
- SmartDoctor
- MSI Afterburner
- FurMark
- A good PSU
- A wattmeter
- Other tools
SmartDoctor
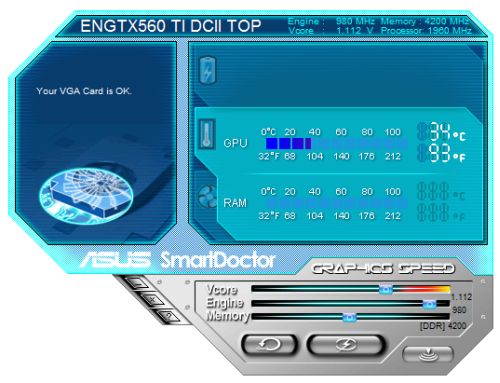
SmartDoctor is ASUS’s graphics card overclocking and tweaking utility. There is no easy way to download SmartDoctor and there I uploaded the latest version on Geeks3D server.
ASUS SmartDoctor Download:
[download#201#image]
For the needs of this article, I used SmartDoctor for one thing: the GPU voltage. SmartDoctor is not really handy for setting values: sliders are no very precise and then it’s rather difficult to set an exact value for GPU voltage, GPU core clock or memory speed.
With the current GTX 560 Ti BIOS, the max possible value for the GPU voltage is 1.150V.
MSI Afterburner
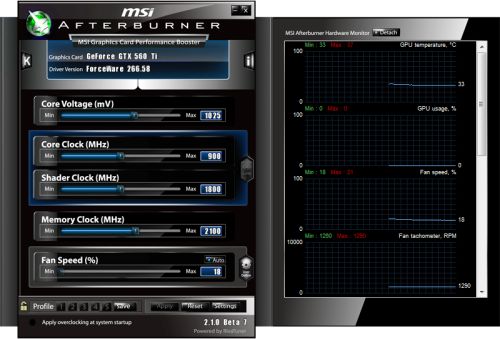
MSI Afterburner is a powerful overclocking tool: you can set all possible values on a graphics card: GPU core clock, GPU voltage, memory clock and fan speed. What’s more, you can precisely set every value and this is nice!
I used Afterburner to change the GPU clock speed.
Remark: I did GTX 560 Ti overclocking session several days ago and at this moment, GPU voltage tweaking in MSI Afterburner was not possible. Today, with Afterburner 2.10 beta 7, you can tweak GTX 560 Ti VDDC (Vcore in Afterburner).
FurMark

FurMark is Geeks3D’s GPU stress test (more tools are available here). For this article I used the upcoming FurMark 1.9.0 (I’ll release it as soon as I have a complete day to polish it –very shortly!) because it pushes the GPU a bit further than FurMark 1.8.2. But FurMark 1.8.2 is good too!
FurMark is very good for one thing: GPU temperature and power consumption. With FurMark you can be sure to reach the max possible GPU temperature. Same thing for the power consumption: any other application can pull as much power from your graphics card than FurMark.
A good PSU
A good PSU is required for a serious overclocking session. My testbed features a Corsair AX1200 which is one of the best power supply units. This PSU is really useful for n-way SLI (GTX 580) or CrossFire (HD 6970) but in our case, a 750W PSU would have been enough. Why a good PSU is required? Mainly to resist to the current peak (over current) that occurs when FurMark is launched. With an insufficient PSU, you will experiment system reboots or other issues when you deal with overclocked GPUs. In any case, when you have one or several high-end overclocked graphics cards, a high quality and enough powerful PSU is a must!
A wattmeter
Not fundamental but it’s useful to get a feedback of what’s happening. I always check the GPU temperature and the total power consumption of the testbed to know if things work as expected. A simple example: my testbed with a GTX 580 (default clocks) has a power consumption of around 480W when FurMark is running. But when GTX 580 OCP is enabled, the power consumption does not exceed 350W…
Other tools
To validate your overclocking you have to use your favorite game or benchmark to be sure the new OC setting is good for you. I used 3DMark11 and Unigine Heaven 2.1 (D3D11 render path) because they are popular. As you will see it, there is no absolute OC settings. An OC setting can work for a certain 3D app while it will fail for another.
How to find the max stable overclocking setting?
There is no absolute overclocking setting (or OC setting) for a graphics card but rather per application OC setting. The goal is to find among your applications set, the OC setting that is stable for the whole set. For example, in this OC session, my applications set includes FurMark, 3DMark11, Ungine Heaven 2.1 and Crysis.
As you’ll see in the second part, some OC settings are stable for 3DMark11 but not for Unigine Heaven or for FurMark…
Article index:
thx m8 ur test`s has saved me time alot ot time trying i have the same card sadly its not a 1000 monster but it is a beast 😛 so gona stay like this tell i get my self another for sli ^^
What Bios were you using for 560ti? Because my max Vcore is 1.087 only. And i’ve uptated the bios from asus website.
The bios version of the GTX 560 Ti is available in the GPU-Z screenshot on this page.
Would you have remove smart doctor if OverClocking using using afterburner ?
I got the same card but my over clock settings exceed a little more and stable =D
i also do not cross 77 degrees in heaven and 3dmark 11.
core voltage 1025
core clock 1015
shader clock 2030
memory clock 2100
graphics score is 5377 =]
my rig
i5 2500k – OC’D
asus p8z68-v pro
asus 560 ti – OC’D
8gb ram (2x4g)
500 & 300 GB hdd
xfx 550 psu
noctua nh d-14 cpu cooler
azza hurrican 2000
lg dvd drive
Heya, im kinda curious, what % RPM speed does the card run, with these OC approved Settings?
I wanna try out this setting, but im uncertain on what the Coolers RPM speed should be to maintain stability. 🙂
@970 MHz Core
@1940 MHz Shader
@2250 MHz(4500 MHz in Asus Smart Doc.)Memory
@1.062 mV—->Burn-in test:OK!
What was the fan speed set on?