I decided to make the first tutorial of this year about how to sew a beanie. It’s a nice and quick sewing project with an easy pattern to draft. I had never sewed beanies myself before, only knitted, so this was a new thing for me, too.
In the end I made quite a few beanies as I was exploring different alternatives and will show you 5 styles.
Beanie Materials
For the sewing materials I went to fabric store and headed to the wool and knit fabric section. I was mainly after light- and midweight wools that would have at least a minimum amount of stretch. Another important point was to avoid itchy wools.
A fleece would also work fine. Or just plain midweight jersey. Depending on the look you want.
The beanies will be cut so that the maximum amount of stretch ends up horizontally around the beanie. The quickest way to line them is to cut the main layer and lining in one piece. This means that the fabric needs to be twice the height of your pattern piece.
If you want to get away with buying less fabric, you can cut the main layer and lining separately.
Basic Beanie
Let’s start with the most basic beanie pattern. It’s like a woolly hat with a folded brim.
For me, the best material for this one is a midweight rib knit, because you’ll need that extra stretch to fold the brim.
Basic Beanie Pattern
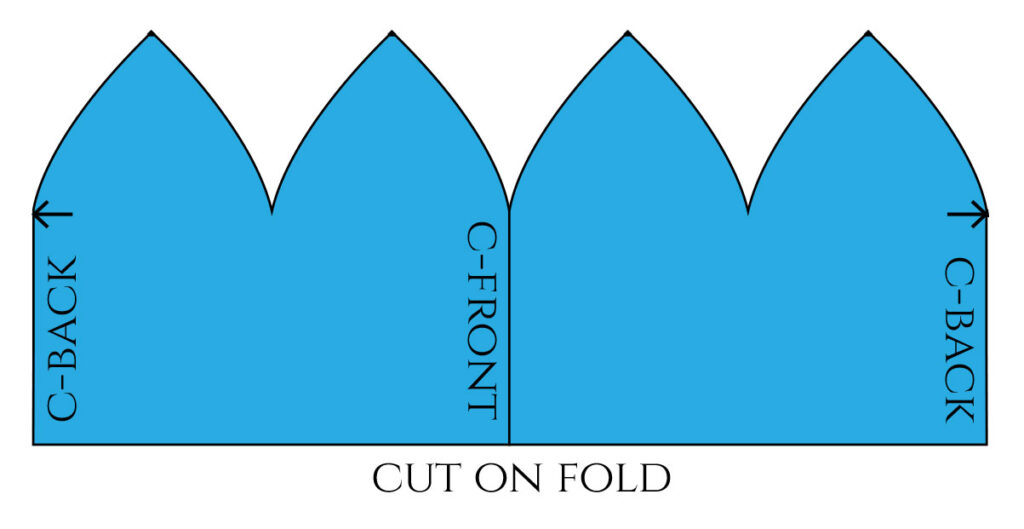
This is the most basic beanie pattern of them all. You’ll only need your head circumference measurement and then divide it in half (because the initial pattern covers half of the head circumference).
Start by drawing a rectangle where the height is 20cm (7 7/8″) for adults and the width is your half head circumference minus 1cm (3/8″). In reality you need to take into consideration the type of fabric you’re working with; the more stretch it has, the more you need to remove from the measurement. I found that 1cm was enough for fabrics with a small amount of stretch.
As an example, let’s say your head circumference is 58cm. 58cm /2 =29cm Then, 29cm-1cm =28cm.
Divide the rectangle into 4 even spaces, and then add another guideline horizontally, 11cm (4 3/8″) from the top. If you’re working on a smaller size, the idea is that this guideline is slightly under the middle point of the rectangle.

Now that you have all the guidelines, you can draw the actual beanie pattern shape, as shown.
Try to create a right angle at the top, where the two lines meet. These lines don’t actually need to be very curved. The only thing is, that you’ll want them to become a smooth, continuous line where the arrows point.
This was actually driving me a bit nuts while sewing, because it was so difficult to avoid creating a bump where the curve ends. Or alternatively, if I managed to avoid the bump, then I’d have too much curve. You’ll see what I mean if you make one yourself! 😀
Anyways, copy the curves (mirrored) to complete the other side of the pattern. These two should be identical.
Then, add the part that will be folded upwards. I added 5cm (2″). Of course, you can also leave this part out.

Finally, mirror the whole piece. This way, you’ll get the whole head circumference.
Here you can see how the c-front of the beanie is in the center of the pattern and there’s a seam at the c-back only. The remaining two “darts” are at the side seam position.
The piece will be cut on the fold so that you also get the lining and the edge will automatically be finished.
You can test the pattern without the lining first to ensure that the height works for you.
Sew a Beanie
But how is the beanie then sewn? Well, that’s easy!
Start by cutting the piece on the fold. Even a small 0.6cm (1/4″) seam allowance is enough, especially if you intend to use the serger. Place pins where the dart tips are so that you have reference points.

First, bring the two sides in the middle, so that you can sew the two “side seams” at both ends right sides together.

If you use the sewing machine, choose the zig-zag stitch. I found it initially better to sew with the sewing machine as it was easier to correct the seams if I wasn’t happy with the curves.
Press the seams open.
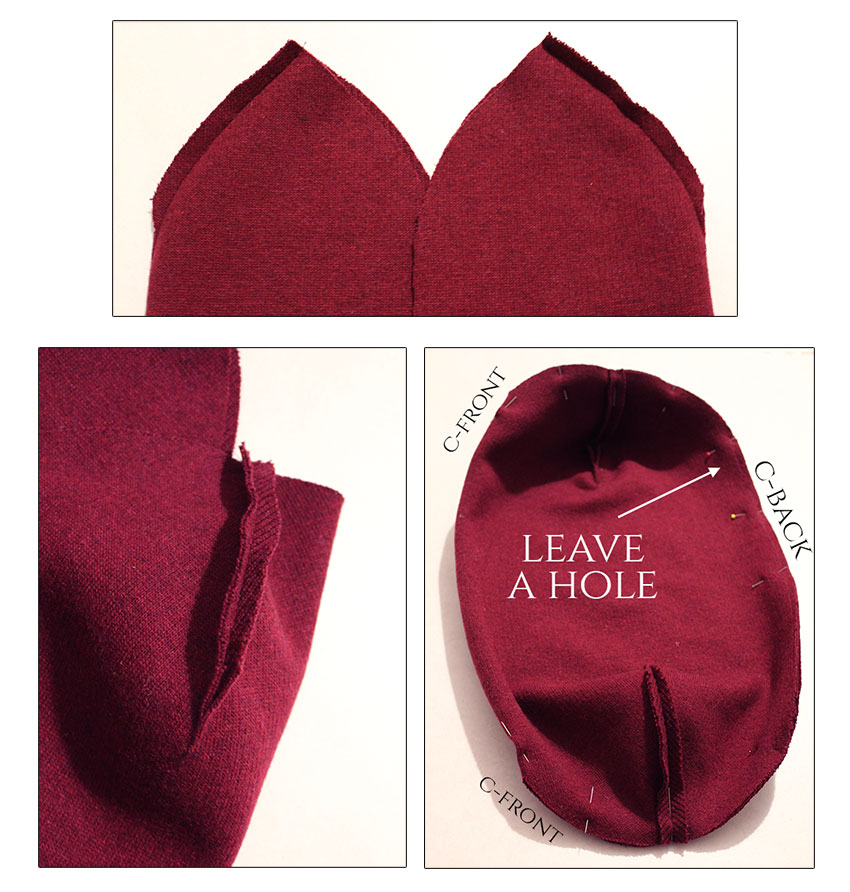
Then, sew the front and back seams, leaving a hole somewhere within the lining section of the seam, so that you’ll be able to turn the right sides out. I think just below the curve is good (see the arrow). This way it will remain hidden.
Press the seams open.

After having turned the right sides out, you can close the hole by hand stitching.
Finally, place the lining inside the main layer of the beanie and attach the two layers together at the top with hand stitches, so that the lining won’t shift. Then, just fold the brim and your beanie is ready.
Here’s mine.

You could also attach a pom pom at the top if you like the look.
Basic Beanie Pattern Version 2
While I was researching beanie patterns I went to various clothing stores (with nonchalance) to see how their beanies had been constructed.
I found that most of them were not done like the previous beanie I showed. Therefore, I wanted to test this other way of drafting the pattern. I called it the Basic Beanie Version 2.
The initial measurements are the same as before: half head circumference minus 1cm and 20cm for height.
However, instead of dividing the rectangle evenly into 4 sections, you divide it first in half, and then the two halves in 3. This way the side seam “darts” become larger, covering 2/3 of the area, while the c-front and c-back “darts” cover 1/3.

As you know, the larger the darts are, the longer they need to be. I made the c-front and c-back darts 10cm (4″) long, and the side seam darts 12cm (4 3/4″) long. Add guide marks along the guide lines before drawing the curves.
Again, aim for a right angle at the top and smooth, continuous lines where the curves meet with the straight lines. Mirror the whole piece, as before. You can add a folded brim, if you want.

I ended up using this pattern for two of the beanies that follow.
Sew a Beanie with Ears
I noticed while going around the stores that beanies with cat ears were a thing. So, here you go!
You already have the beanie pattern. But now you need to draft the ears.
You might want to modify the ear pattern and make it slightly bigger though. I think mine looks like some sort of a deer or cow instead of a cat. 😀
The Beanie Ear Pattern
First, draw a rectangle that you’ll use as your guide. Then, draw the ear shape inside. You’ll get the lower curve shape from the beanie pattern, where the ear will be attached.
The ear consists of two pieces: the front and the back.
I made the back side slightly larger and added a little pleat to the front side by slashing and spreading.
Cut the pattern piece with the pleat folded to get the correct shape.
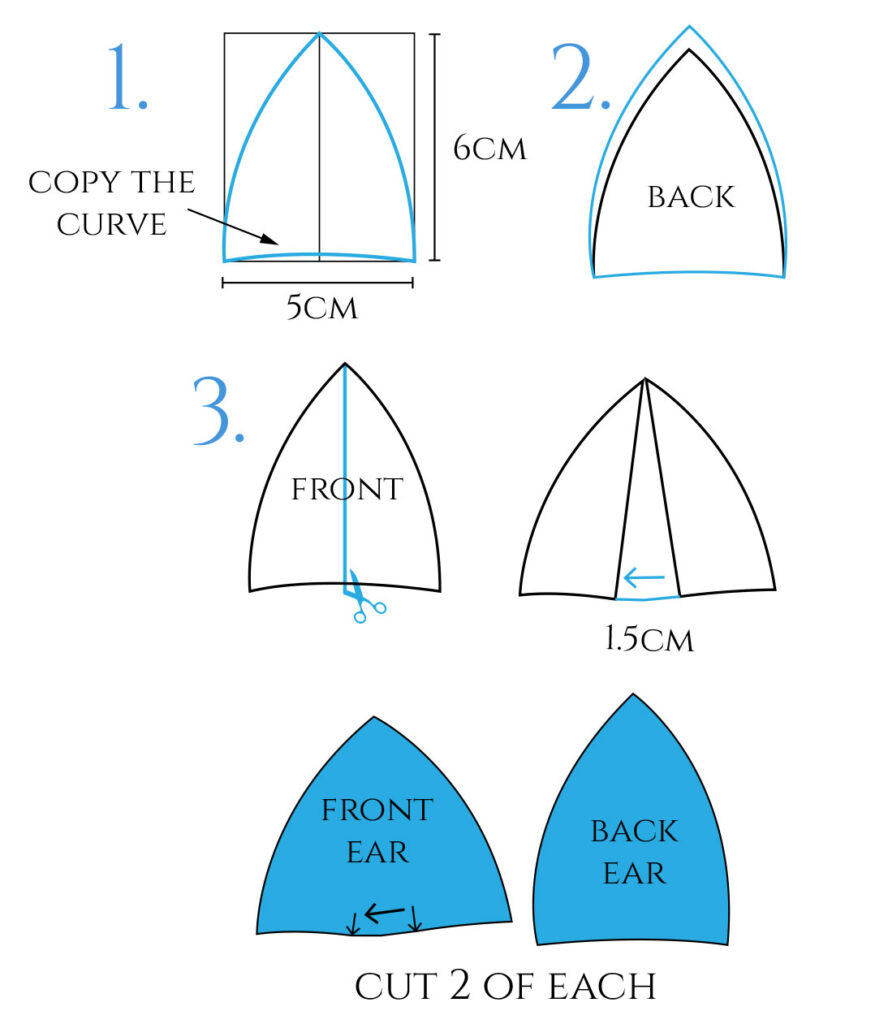
Mark the ear placement onto your beanie pattern, so that the left and right sides will become symmetrical. The ears will be sewn into the side seam “darts”.

The Sewing
Now we have all the pieces to sew a beanie with ears. For this version, I chose a brown midweight wool with a small amount of stretch. I think this fabric is normally used for sewing winter coats, but it seemed to work well for my hat, too.
As before, this beanie is cut on the fold and the lining is included.

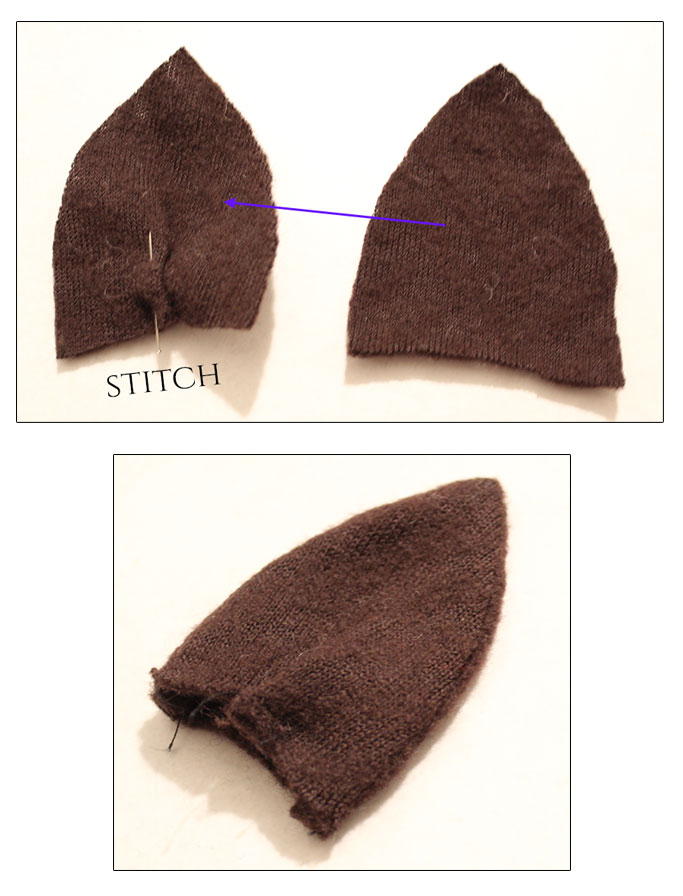
Prepare the ears. Stitch the folds in place so that they point in the opposite directions. Then, sew the back of the ear to the front piece along the edges.
As the fabric had some stretch, I had no difficulties sewing the pieces together even though the back piece was slightly bigger.
Trim the seam allowance around the tips before turning the right sides out and pressing the pieces. You should see part of the back piece all around the ear once you’re done.
At this point, you can sew the side seam darts of the lining side normally.
Pin and stitch the ears in place before closing the seams. Ensure that the front side of the ears ends up pointing towards the front of the beanie.
Press the seams open.

Then, you can complete the beanie as normal: close the c-front and c-back seams, leaving a hole so that you can turn the right sides out. Close the hole with hand stitches.

In this case I chose to attach the lining to the main layer where the ears are, because this allowed me to flatten the seams better.
Here’s my deer/cow ear beanie. I think maybe even just 1cm-1.5cm wider ears might’ve made a difference.

Fancy Beanie with Gathers
The second beanie I made using the same pattern as a base became a fancy beanie because of the choice of fabric. You see, I found this sparkly knit fabric! I’m not sure what it’s called exactly, but the inside is smooth like lycra and the outside is rough and sparkly. It also drapes really nicely.
There were lots of color options and initially I was thinking about gold, but as usual, went with black.
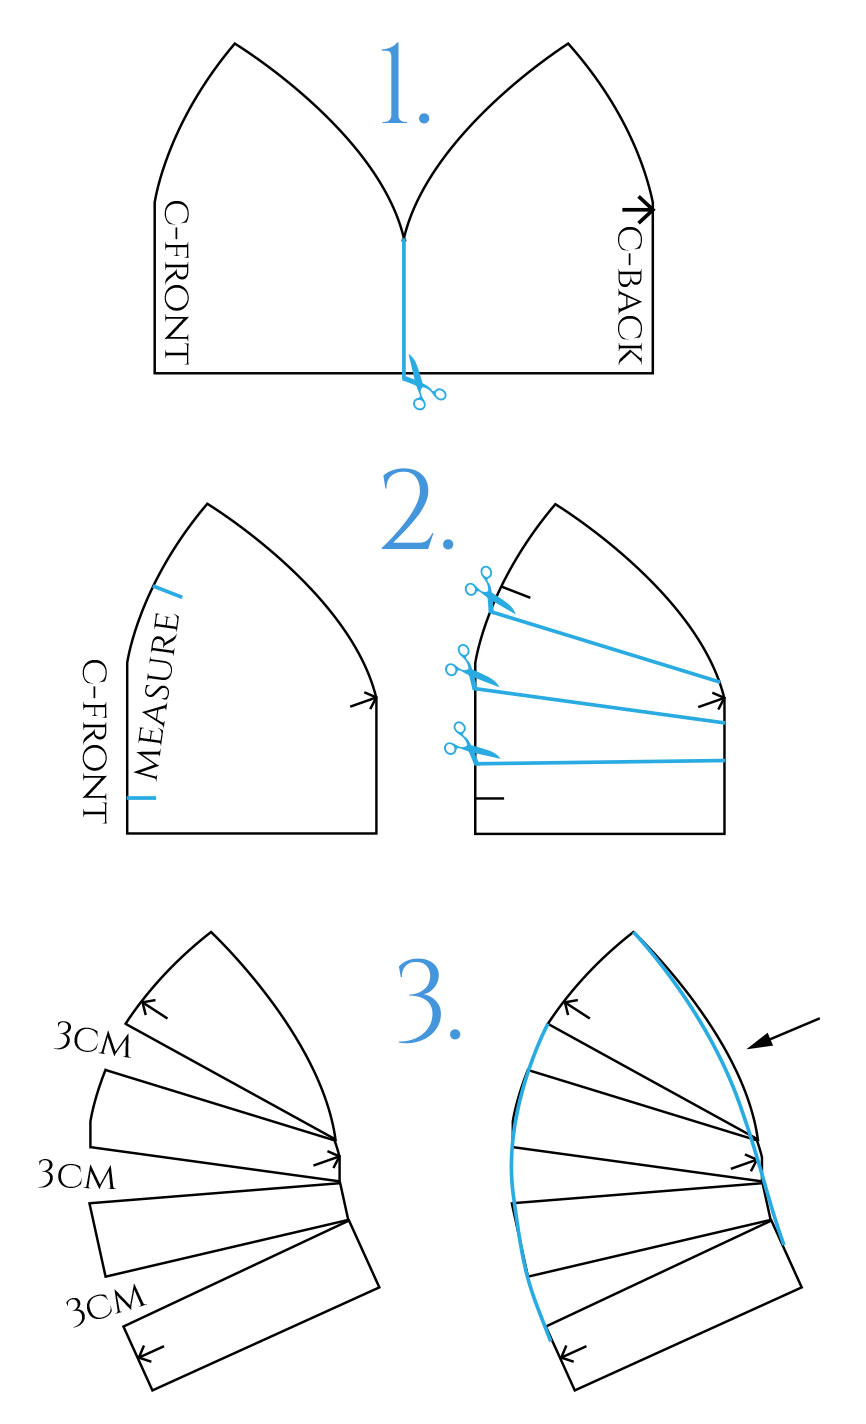
To add gathers to the pattern, it’s necessary to separate the front and the back sections.
- Here we have the basic beanie pattern version 2 and I’m cutting it along the side seam so that I end up with a separate front and back piece. The back piece is ready as it is. Just add a notch where the side seam curve starts.
- I wanted to have gathers at the front. So, I decided the area where the gathers would go and added notches. Then, I measured the seam length between the notches so that I’d have the target length. Having gathers means you need to add extra volume to the seam with the slash & spread method. First, draw three lines as shown.
- Spread each section by 3cm (1 1/8″) and re-draw the lines. It’s a good idea to remove that extra roundness from the side seam.
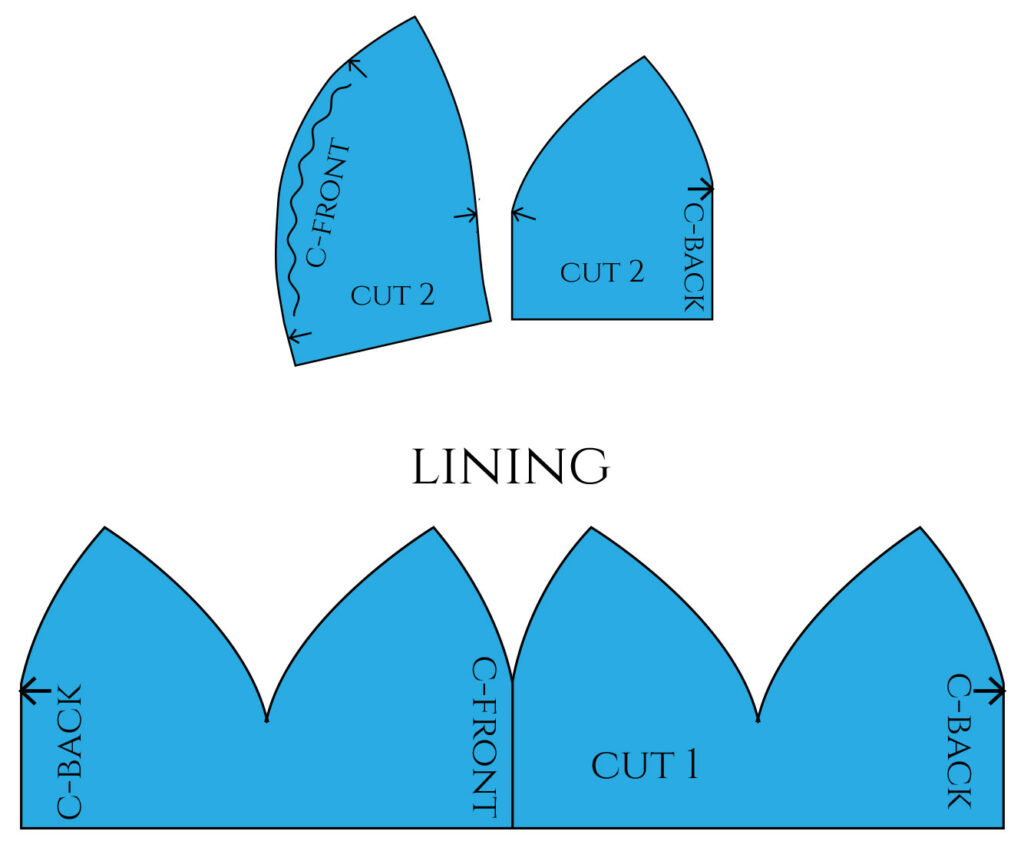
As for the lining, you can use the basic beanie pattern as it is, but remove 2cm (3/4″) from the hemline. This way the lining will be slightly shorter and the seam will remain hidden.

These are the final pattern pieces. The main layer pieces will need to be cut twice, although, you could also cut the back piece on the fold instead and avoid the c-back seam.
Sew a Beanie with Gathers
Once you have cut the pieces, close the front seam, press the seams open, and then sew gathering stitches into the seam between the notches you marked. Gather until you reach your target measurement.

If you forgot the target measurement, you can also compare the c-front seam length to the c-back seam, as these two are identical.
Close the c-back seam, too, and then sew the front and back of the beanie together along the side seams.

Sew the beanie lining as usual, starting from the side seam “darts” and then close the c-front dart and back seam in one go.
This time the main layer and the lining will be united along the hemline. So, place the main layer over the lining piece, right sides together, and pin the hemlines before stitching. Remember to leave a little hole around the c-back so that you can turn the right sides out.

After you’ve turned the right sides out, close the hole with hand stitches and unite the lining and the main layer at the top.
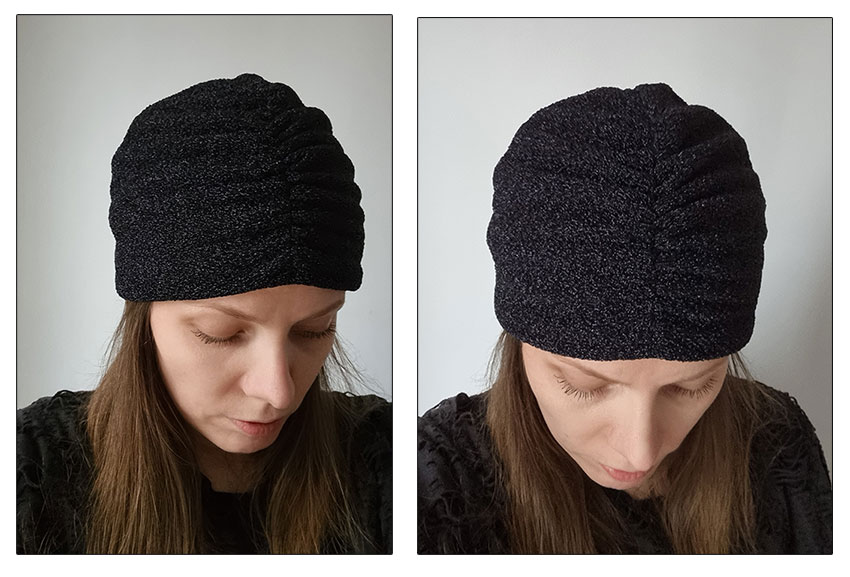
Here you can see how the lining starts further up and the seam remains hidden inside the beanie.

Here’s what the fancy beanie looks like in the end.
Make a Slouchy Beanie
What about a slouchy beanie? This is an easy variation of the first basic beanie. You just make the pattern higher so that you get extra room at the top.
I made mine in a lightweight wool knit with quite a lot of stretch. Therefore I removed 2cm (3/4″) instead of 1cm (3/8″) from the half head circumference. The rectangle is 26cm (10 1/4″) high this time to create that extra room at the top.
As a consequence, the horizontal guideline goes 15cm (5 7/8″) below the top of the rectangle. The vertical guidelines are divided evenly.
Draw the curves. The tips will be more pointed this time, so don’t worry about the right angles.

Mirror the piece to get the whole pattern.
This beanie is sewn exactly like the ones I showed earlier. Only this time I decided to add gathers along the c-back seam to force the beanie to tilt backwards.
I made the gathers by hand, as I wanted to unite the two layers together and it would’ve been really difficult to do with the sewing machine. This is the last step after having finished sewing the beanie.

This is what the beanie looks like:

If you want it to have even more room at the top, just make the pattern higher.
Beanie with a Flower
Let’s finish this round with a flower beanie.
As a base I had the first beanie pattern. I separated the lining and the main layer so that there was a seam along the hemline.
My fabric was medium weight wool (another one from the coat wool section). Only this time there was no stretch at all, so I used the exact head circumference measurement. I also made the pattern slightly shorter in height.
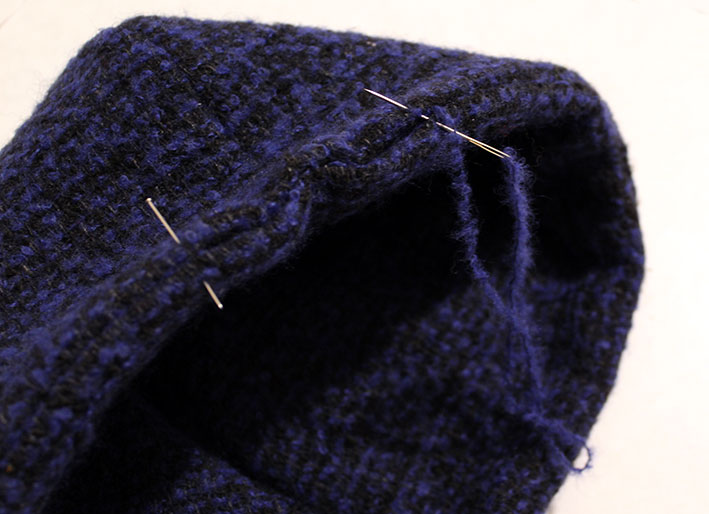
There’ s only one picture I took during the sewing process. I took this to show you how you might be able to extract thread from your fabric and use it for hand stitching.
Making the Decorative Flower
The main thing of this beanie is of course the flower. I used the same fabric as for the rest of the beanie.
Decide on the size of the flower and then draft a petal pattern. Consider that the petal height will cover about half of the flower’s final diameter. For example, my pattern was 6cm (2 3/8″) high and about 4cm (1 5/8″) wide at the base.

I cut 7 pieces for the first layer. They are hand stitched at the base with gathering stitches. Overlap the petals as you go.
Once you complete the round, gather until the gap in the center is completely closed. Make a knot.

To make the flower more interesting (I was winging it!), I decided to make a second, smaller layer to be placed on top. So, I trimmed the petal pattern making it slightly smaller and cut 5 pieces to prepare a similar flower. Then, I attached it on top of the larger flower and stitched a button in the center. You could also use beads or pearls.

I pinned the flower to my beanie to decide on its final placement. It seemed to look the best along the side, slightly more towards the front of the beanie. Here it is:

What’s Next?
After all these beanies, you’d think I now have enough hats, but actually there might be more! I’m not going to say anything else now, but hopefully I will have another beanie tutorial soon with more advanced styles…
In the mean time, check out the gloves tutorial from last year, or this other hat tutorial, if you haven’t seen them yet. And of course, sew a beanie and let me know how that went!


8 Comments
As usual, you make everything very clear ! As I have a collection of old irons, I tend to use them as shape for parts of hats.
Thank you. 🙂 What a cool idea! The shape really does look very similar.
Thanks for this, I am sure trying this out. How do I send a picture when done?
Awesome! 🙂 Would love to see a pic. You can email it to info(a)theshapesoffabric.com or if you’re on Instagram, just tag me @behind_shapesoffabric
Hi! I’m just confused on the first beanie pattern, I get to the spot where I fold the pattern in but I become confused from there on where to sew and what to do! Any chance you could aid?
Hello. If you’re still pondering about this: you start by closing the 1st and the 3rd “curved dart”, both at the top and the bottom. If you fold the two long sides so that the edges meet at the center, you should see where to sew. They represent the side seams. Once you’ve closed those, then you can close the c-back and the c-front seams in one go. 🙂
The 4 seams at the top are also so pointy, my hats always end up looking like a jester’s hat!!! Its so annoying! I tried to press it down with my iron but its not working. Im using ribbed knit fabric.. not sure if im sewing it too close to the edge or too far from the edge. Im new at sewing btw so … dont know if the problem is my sewing or the material that im using. Why is it doing that??
Yes, I found that difficult, too. Hadn’t been sewing beanies before. You just need to continue the seam downwards, making it round where it meets with the straight part so that it creates a continuous shape. However, if you look at some shop-bought beanies, you’ll notice that many of those actually have angular shapes, too. 🙂